When I think of a significant experience, I think of my first time in Kellogg Community College’s darkroom. Recently, I came back to college to study photography and multimedia, which requires you to take an Intro to Photography class. It was my second day, and I was expecting another session of sitting in a chair talking about how a camera works or what the other various terms of a camera are and what they mean. However, I was pleasantly surprised to find out that I was only half correct. After talking for about a half an hour about scanograms and photograms, our professor, Ryan Flathau, decided to take us over to the darkroom to show us how a photogram was made in real time.
We exited our classroom, walked down the hall and went through the entrance of the darkroom, which was a hallway with walls made of a black felt-like material. The hallway took a hard left and then a hard right, making it so that no outside light could get through the doorway. I was surprised to see that the lights of the room were on; bright LEDs that would surely ruin the photogram process. When making photograms, the paper used is a light-sensitive, glossy type of printing paper. Any light exposure will prematurely develop the image of the paper, rendering it useless. However, no one was using the darkroom at the time that we were coming in, so we were able to keep the lights on to begin learning how everything worked.
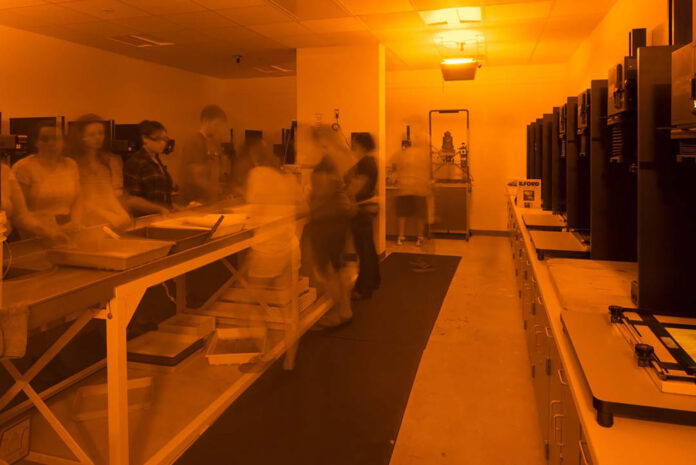
To give some description of the room, it is around the same size as a standard one-car garage. At its center is a massive, long, stainless-steel sink that takes up most of the room. The sink is flat with two spouts on each end. In the center are four bins in a line and a water tank meant for holding individual pieces of paper. On the outer walls are several counters that hold light-exposing machines used for creating the designs on the photograms. Each machine is separated by a small wall to ensure that two workstations being used at once will not interfere with each other. On the ceiling are two sets of lights: standard hanging LEDs and orange/red light bulbs known as safelights.
Professor Flathau first showed us the four bins we would use to submerge our photogram paper in. The first bin is used for photo development chemicals, which reveal the image that has been ingrained into the silver nitrate that coats the paper. The second bin holds another chemical called stop solution, which is an acidic-based chemical that, of course, stops the revealing of the image. The third bin contains fixer chemicals that stabilize the photo and clean off any silver halide that remains. The fourth bin simply holds room-temperature water, which causes the image to become permanently visible and impenetrable to light.
At the time, all this information coming to me at once was a bit overwhelming. I did not sign up for a chemistry class, and though I was fascinated by the process, I was wary of what strange chemicals can do to the human body. Professor Flathau, however, reassured us that these chemicals would not harm us in any way unless we ingested them. This was reassuring to hear because none of us were likely to put random chemicals in our mouths.
Because Professor Flathau had shown us the chemical process, it was time to take us to one of the various machines that would expose the paper. These machines are called enlargers, which are, in the simplest of terms, adjustable lamps. After aligning the paper on the board beneath the enlarger, the lamp can either be raised up or lowered so that the beam of the light’s exposure has the perfect width and height of the paper. Then the enlarger’s timer is started and the paper is exposed for whatever amount of time is set (in the case of a photogram, around 30 seconds).
After we finished learning how everything worked, we began working on a photogram. We turned off the overhead lights and turned on the safelights, exposing the whole room in a soft red glow. To form an image on a photogram, you need some sort of object to block the light of the enlarger’s beam, so Professor Flathau got out his tote of supplies and pulled out the most unexpected item: a bag of popcorn. Previously we had been told never to bring food into a darkroom, but I suppose teachers can do what they want to when they desire to experiment. He then told us that he was curious how the butter of the popcorn would affect the process of the photogram and to do as he says, not as he does. After opening the bag, he poured its entire contents out onto the paper, simultaneously filling the room with the smell of movie theater while also creating a heaping mess on his workstation. Then he started the enlarger’s timer, exposing the popcorn to the orange glow of the beam.
Swiftly after exposing the paper, he ripped it out from under the popcorn to begin the soaking process that I previously described. The process of the three chemicals took about five minutes, and the water soaking took about 10 minutes. Then he pulled it out of the water bin and squeegeed both sides of the photogram.
At that moment, the process was complete and it was time to see what image had formed on the paper, so we left the darkroom to focus it under a direct light to see every detail. The photogram was very abstract looking and did not resemble popcorn. Instead, it looked like a series of black splotches and very dark little smears that we theorized were butter and grease. It was a neat little image and got us inspired about what other interesting things we could make using the photogram process. However, Professor Flathau was unsatisfied with the product and decided to take us back into the darkroom to experiment on another specimen.
